Sunday, February 5, 2017

Oat Bran Muffins - Lower Carb, All Real, All Good


In August of 2016, Mr. Dwayne was diagnosed with type 2 diabetes. It was not something that was on our radar, but probably should have been. We'd both gained weight over the last few years of extreme stress and deaths in our family. I have to admit, we often took what I call "The Ice Cream Cure." Hey, carbs work. Emotional eating happens because, in the short term, it works. 

I've always been for real food. Lots of fruits and veggies. I like to eat things that have some life force in them - things that have been alive recently. I thought our diet was pretty good. I do take time to cook from scratch on most occasions. But, then, mmmmm, the ice cream. 

I came of age cooking for my family during the low-fat craze. Some of my favorite recipes come from Jane Brody's Good Food Book: Living the High Carbohydrate Way. I learned about beans and rice and combining plant proteins. I learned how to use various whole grain flours and traditional baking methods from Laurel's Kitchen Bread Book - which remains a classic resource. While all this is pretty healthy, it doesn't suit the needs of my family now.

Now, I have to learn to cook a different way - fewer carbs, carefully selected, in small portions. 

My initial forays into the online world of "low carb" revealed a lot of meat and dairy and treats with artificial sweeteners. Some advocated "no carb" or "keto" - an extreme approach that seems to be about weight loss more than health. It all seemed out of balance to me. Yet, we needed to take action and improve my sweetie's health fast. 

We did eat more animal protein and dairy than usual. It made the first few weeks fairly painless for Mr. Dwayne, who did not have to give up his favorite foods. After a few weeks of this, I was dragging and cranky. Super low carb was not a viable or sustainable option for me. I added in a few more fruits and whole grains. Mr. Dwayne lost weight quickly. 

Here we are, 5 months later. Mr. Dwayne has lost 45 pounds and I have lost 20. I've been working on better fitness, with Zumba classes and a gym membership. Overall, we've found a better balance in our diet and we both feel better. The joke at our house is that cabbage is the new potato. 

The only thing that did not go well were Mr. Dwayne's cholesterol numbers. They went up 10 points in that 5 months. Not the good kind either. So, we had to change again. Minimal cheese and limited red meat and processed meat. Lots more veg. So far so good. 

I've been searching for a way to get more water soluble fiber into his diet. This type of fiber is proven to assist with heart health, gut health and in lowering cholesterol. The problem is, he hates beans and only likes oatmeal in the form of cookies. So, I set out to find a way to get him the fiber in a way that is full of flavor and nutrients and low in carbs. Most of the oat bran muffin recipes online have lots of sugar, plus white flour. Low carb muffins seem to all have artificial sweeteners. By combining a few recipes and doing a lot of testing, I think I finally hit the mark.


This recipe makes 12 muffins, which have 111 calories each, with 15 grams of carbs and 7 grams of sugars. According to the American Diabetic Association and his meals should have 45 to 60 grams of carbohydrates. The nutrition and diabetes management classes with our health provider suggest that each meal should be under 45 grams. Mr. Dwayne considers a serving for breakfast to be 2 muffins, keeping his carbs well within the 45 gram limit.

Because they don't rise as much as traditional cake-like muffins, you can fill the muffin cups nearly to the top. You can line the cups with papers or with non-stick spray. I like the crust, so I don't use the papers, even though clean up is easier that way.

Flat topped, but flavorful and moist. They are lightly sweetened with banana, blackstrap molasses and raisins - all highly nutritious foods. I know Mr. Dwayne will enjoy them. We'll find out how they work in the next few months!

Oat Bran Muffins
1/2 cup raisins plus boiling water
2 cups Oat Bran hot cereal
2 tsp. baking powder
1/2 tsp. salt
1 tsp. cinnamon
1 mashed ripe banana (about 1/2 cup)
2 tbsp. oil (I used olive oil)
2 tbsp. black strap molasses
1 egg
1 cup milk

Preheat the oven to 325 degrees. Line or grease a standard muffin tin.

Place the raisins in a heat proof bowl and cover with boiling water. Set aside.

Combine the Oat Bran, baking powder, salt and cinnamon. Set aside.

Mash the banana and add the oil, molasses and egg. Whisk to combine. Whisk in the milk. 

Drain the raisins. Stir the milk mixture and raisins into the oat bran mixture until moistened. Evenly distribute between 12 muffin tins. Bake in the preheated oven for 20 minutes. Remove from muffin tin to cooling rack immediately. Enjoy!


Sunday, January 29, 2017

Mastery Class - Grapefruit Marmalade with Honey and Mint

 Pretty, right?

I've made a lot of marmalade. I love it. I searched my blog and found I have made at least 7 varieties. I make new batches of most of them each winter, when the citrus fruits come in and the kitchen is cool. 

Marisa at Food in Jars has started a Mastery Challenge. I'm so excited, because I will get to refine my skills and learn new ones. The challenge for January is marmalade. I missed the deadline to make this an official entry, but I want to share it anyway. Next month is salt preserving and I'm already scheming. I'm grateful for the challenge to try new techniques. I may even screw my courage up enough to try pressure canning!

 I scrubbed the fruit, peeled the zest and sliced it thin.

This marmalade submission was delayed for the best possible reason - vacation! I spent two weeks of January on the Big Island of Hawaii. Ahhhh..... When I returned, I visited Ms. Paula and saw that the grapefruit tree behind her apartment building had dropped a bunch of perfectly nice fruit. We scooped them up and I took them home. Fast forward one week, when I finally had time to do something about this literal windfall. I lost about a quarter of what I had gathered to the bruises that has begun to mold. The bruises only became apparent over time. If I had prepped the fruit sooner, I would not have lost so much. (I'm taking this lesson to heart, as I have many dozens of Meyer Lemons in my kitchen even as we speak!)

 Combine the zest and 4 cups cold water.

 Bring to a boil and simmer for 20 to 30 minutes. 

 While the zest simmers, cut away the pith and supreme the fruit.

Grapefruits are more bitter than most citrus. The fruit itself is bitter, not just the rind. By simmering the zest, much of the bitterness will be removed. For this recipe, I discarded the simmering water. For less bitter fruits, I often add some of this simmering liquid back into the recipe.

I spent some time thinking about what flavors might enhance grapefruit. I thought about the mint I like in citrus salads. I thought about the way people sometimes broil grapefruits halves with sugar to make a kind of caramel topping. Then I thought about honey. Grapefruit, honey and mint! And, it worked!

 The prep happened one evening, then, off we went to bed.

After cooking, skim the foam and add the mint sprigs. They will add a bright flavor!

 Remove the mint sprigs. Stir gently, fill the jars and process in the boiling water bath.

Yum!

Grapefruit with Honey and Mint
About 10 Grapefruits - enough to result in 1 1/2 cups sliced zest and 4 cups segments and juice
4 cups Water
1 cup Honey
4 cups Sugar
1 Bunch of Mint

Scrub and dry the grapefruits. Peel just the zest. If your peeler is wide (like mine) stack and slice the zest. Place in a pot with 4 cups cold water and bring to a boil. Reduce heat and allow to simmer for 20 to 30 minutes.

Meanwhile, use a sharp knife to cut away the pith. Cut the segments away from the membrane. Do this with your cutting board inside a pan to catch the juices. Add the segments and juice to a large measuring cup. 

Drain the zest and rinse with cold water. Add to the segments and juice. You should have at least 4 cups total. Add the honey and sugar and stir. Cover and place in the refrigerator until you are ready to can. 

On canning day, prepare the boiling water bath and 6 half pint jars, their lids and rings. 

Place the prepared marmalade in a large pot. Bring to a boil and continue to boil, stirring occasionally, until it reaches 220 degrees or until it passes the cold plate test. This will take 30 to 40 minutes. 

While the marmalade is cooking, prepare the mint by washing it and tying it into a bundle with cooking string. 

Remove the pot from the heat and skim off any foam. Use tongs to place the mint bundle into the mixture. Submerge it and stir gently. Allow to steep while you sterilize the jars in the the boiling water bath. 

Remove the mint bundle and any leaves that may fall off. Stir gently to distribute the solids throughout the thick syrup. Fill the hot prepared jars, leaving 1/4 inch head space. Wipe the rims and cover with lids and rings. Process in the boiling water bath for 10 minutes. Carefully remove to a towel lined tray. Makes 5 half pint jars and a little left to use right away.


Friday, January 20, 2017

Radom Food Fridays - Fire Cider


Last year, after a bout of food poisoning, I caught everything. I had some kind of upper respiratory thing or another for nearly 6 months, including a bad case of bronchitis. I knew I had to get busy making myself well. My personal biosphere had gotten seriously out of whack. This is one of the things that really helped. I made this batch a few weeks ago, as Winter came in. By paying attention to my diet and exercise and consuming probiotics and this fire cider, I'm doing pretty darn well. There was a cold that went through my office like wildfire and I only had it in my nose for about 12 hours. I call that a win! Much better than last year!

There are many fire cider recipes around. I think it is best for you to make a concoction that suits your tastes and your needs. Some people add honey, for both its health benefits and flavor, but that just doesn't work for me. I was truly surprised at how much I like this fire cider as a savory ingredient. Mostly, I drink a tablespoon in warm water during my snack break at work. It is a lot like hot and sour soup and goes great with cheese and crackers. It also adds a nice zing to soups, sauces and salad dressings. It really is a kind of hot sauce and can be used in the same way.


Quality really counts here. Use only organic ingredients and use fresh, whenever possible. Your local health food store should have most of what you need. The directions will allow you to make a small or large batch. Purchase according to the size of your jar. The jar pictured above took 1 quart of ACV after being filled with the vegetables.

Fire Cider:
Equal Parts, by weight:
Garlic
Onion
Horseradish
Turmeric
Ginger
Red Hot Peppers (I used Jalapeno)
Whole Lemon

1 large bunch Italian Parsley
Bragg's Organic Raw Unfiltered Apple Cider Vinegar

Thoroughly wash a large jar with a tight fitting lid. Set aside. Peel the onion, garlic and horseradish. Wash all the other vegetables, but do not peel. Cut into 1/4 to 1/2 inch chunks. Slice through the parsley about every 1 inch, including stems. Make a single layer of each item, repeating until you have filled the jar. Pour in the ACV to cover. Close tight and shake. Set in a cool place and shake once per day for about two weeks. The liquid may get cloudy and a sediment may appear. Don't worry - that is the active vinegar.

After about two weeks, strain the liquid into a measuring cup. Store in a thoroughly clean glass jar in the fridge. (I usually sterilize the jar by pouring a hot kettle over it.) This will keep in your refrigerator for quite some time. I've never had it spoil before I use it up. Because of the high acidity, I think it should keep nicely for two or three months.

Here's to your health!

Friday, November 11, 2016

Random Food Fridays - Red Lentil Coconut Dahl and Raisin Almond Quinoa


It really is Fall here in the Valley. Our street-side leaf pick-up has begun. Chinese pistache and liquidambar trees are alight. Our big ol' plane trees are dropping their giant, leathery leaves. There is no nip in the air. Not yet. This is California, after all. We're expecting a high of 77 tomorrow. I'm ready for some chill!

I'm also ready for some soup! This dahl is not quite soup, but it is an amalgam of this red lentil soup recipe from Under Cover Caterer and this recipe from kiwiandbean. It is hearty and spicy and a little bit sweet. Like many of the recipes I share, this is one you can make your own.


Red lentils are easy to work with and a great dried legume for beginners. There is no presoaking and I've never had to do any of the sorting or washing that is necessary with larger beans.

Also, they are pretty.


We've been moving into lower carb eating these days. (More to come on that situation.) However, I know that I can never go so low-carb as to give up beans. This dish is full of fiber, nutrients and healthy fats and spices. This is my idea of real comfort food.

Red Lentil Coconut Dahl
2 tbsp. olive oil
1 cup diced onion
1 cup diced carrot
1/2 cup diced red bell pepper
2 large cloves of garlic, minced
2 tsp. sweet curry powder (I like Penzey's)
1 tsp. turmeric powder
1 tsp. dried ground cumin
1 tbsp. fresh grated ginger
2 tbsp. tomato paste
1 15 oz. can diced tomatoes and their juice
1 can full fat coconut milk (around 13 oz.)
3 cups water
1/4 cup unsweetened dried finely shredded coconut
1 1/2 cups dried red lentils
1 tbsp. lemon juice
t tsp. hot sauce (I like Tapitio)
Salt and Pepper
2 tbsp. butter or coconut oil

Heat the oil in a large pot. Add the onion, carrot, bell pepper and garlic. Saute over medium heat until beginning to turn translucent. Add the spices and stir to coat the veggies. Stir and cook for a minute or so, until the spices become fragrant. Add the tomato paste, diced tomatoes, coconut milk and water. Increase heat and bring to a boil. Stir in the lentils. Return to a boil, reduce heat and simmer, stirring often, until it is thick and the lentils are tender. Add salt, pepper, lemon juice and hot sauce to taste. (To my palate, beans need salt, so don't be shy.) Once the seasoning is to your liking, finish by stirring in the butter or coconut oil. Serve with hot grains of some sort. Try this quinoa:

Raisin Almond Quinoa
2 cups flavorful broth - chicken or veggie
1 tsp. diced dried onion
1/4 cup raisins
1/2 tsp. ground cinnamon
Salt, to taste (omit if your broth is salted)
1 cup quinoa
1/4 cup slivered almonds

Place the broth in a medium sized pot with a tight fitting lid. Add the dried onion, raisins, cinnamon and salt. Bring to a boil. Stir in the quinoa. Cover and reduce heat to low. Allow to cook, covered for 15 minutes. Remove lid, fluff and stir in the almonds.

This is a perfect compliment to this red lentil dish, but is a quick and easy side dish for any meal.


Thursday, July 14, 2016

Sauerkraut with Apples, Fennel and Onions


Sauerkraut is so easy! I had to screw up my courage for a long time before I risked making my first batch. This is only my second batch (it takes a long time eat up 2 cabbages) and it is even more delicious than my first.

The idea for this flavor combination came from my friend Marina. Her dad is Persian and her mom Russian. She said that her mom used to make sauerkraut with cabbage, onions and apples. I thought that sounded great and threw in a fennel bulb that was in the fridge. This ends up hitting salty, sour, sweet and umami flavors - Yum!

Because I didn't grow up with sauerkraut, except on the occasional hot dog, I wasn't quite sure how to serve it. I am delighted to say that it is easy to eat in lots of ways! I don't heat it, because I want the probiotic boost. It has become an easy default side dish. Also, I love this in my sandwiches! It's like a good crunchy pickle! It is a pickle, actually, of the sour fermenty kind.

I used this large glass pickle jar for my first batch of sauerkraut. It got the job done, but made it more difficult than necessary.


It was easy enough to stuff the salt massaged cabbage into the jar, but the opening made it hard to get things weighted down and covered with liquid. I used some of the larger cabbage leaves in place of a plate and weighted them down with a clean jar full of water. Like I said, the end product tasted great, but this required a lot more watching as the leaves kept curling up and needed to be pushed down over and over.


So, I invested in this large, food-grade plastic container. It's easy to tamp down the kraut, monitor and clean up. This picture shows that this recipe makes about 2 quarts.


Once the kraut is pushed down and compacted, a saucer is the perfect size to hold everything down.

 In this container, I am able to use a larger, heavier jar to weight things down.

 It just needs a larger cover. Cheese cloth is perfect!

This is a yummy, if predominately yellow, supper - brats and onions, mashed potatoes, saute'ed veg and sauerkraut. Yum!

Sauerkraut with Apples, Fennel and Onions
2 small green cabbages
1 fennel bulb
1/2 sweet yellow onion
2 Fuji apples
About 2 tbsp. salt

Wash, core and peel the veggies and apple. Slice very thin. Add everything to a large mixing bowl. Sprinkle with 1 tbsp. salt. With very clean hands, massage the salt into the mixture until it starts to release some liquid. Give it a taste and add more salt, a little at a time, until it tastes good to you. Massage some more. Transfer to a very clean fermenting container and press down thoroughly. The juice should rise each time you press it down. Place a very clean saucer or small plate on top of the mixture and press down very hard so that the liquid comes up over all. Fill a very clean jar with water and cover with a lid. Place the full jar on top of the saucer to weigh down the veggies and try to keep them covered with their own liquid and not exposed to air. Cover lightly with a loosely woven cloth. Stir, taste and mash back down daily until the desired sourness is reached. My first batch was made in Winter and took about a week. This Summer batch was ready in three days due the warm temperatures. When the taste is to your liking, move to storage containers and keep in the refrigerator. This will keep for several months if you are careful to prevent cross contamination.

Makes 2 quarts

Saturday, June 25, 2016

Random Food Fridays - Soba Salad


A while back, my friend Larry, gave me a wonderful, two hour, astrological chart and reading. I've always wondered about some of the background influences in my life, because Cancer is so up front. Dwayne and I are both Cancers and we are both a foodie, homey, nurture-fest. I learned a lot about myself that day and became more patient with some of my less favorite impulses. Larry is very knowledgeable and compassionate - A good friend to have on the A-Team.

Because we both have many talents, we made it a trade and he didn't want to cash in his trade right away. He said he'd think of something, and he did. He celebrated his 60th birthday yesterday and will have a big party today. He called in my trade chip for party foods and I'm delighted! There will be a barbecue and lots of good fun. We are expected to have a high temp of 101 today, so some cold foods are in order!

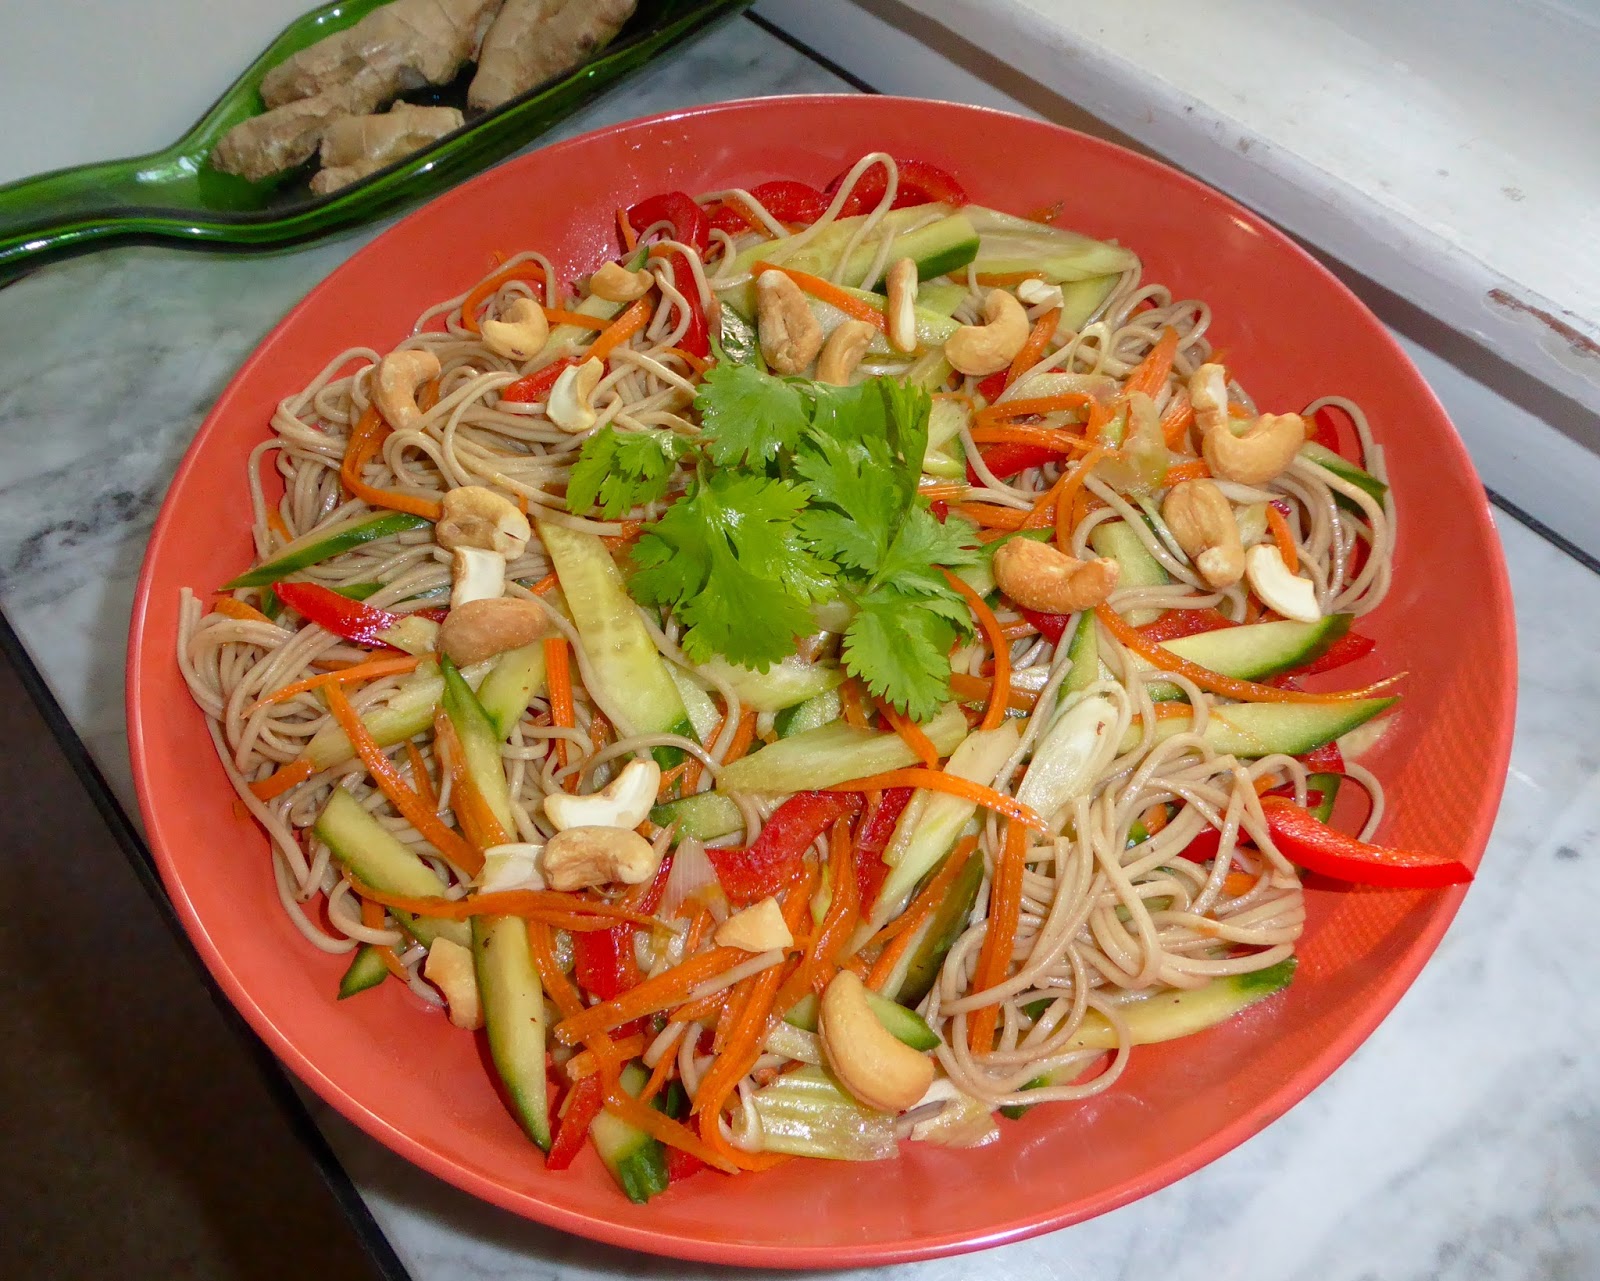
Last night I made four salads - macaroni, potato, three bean and this soba salad. This morning, I have braved the oven and have a sour-cream raisin pie and fresh peach pie in the oven. Larry grew up in Pennsylvania and requested an old fashioned raisin pie, which is sometimes known as Funeral Pie in Mennonite or Amish communities. Here is the recipe I used. I haven't tried it yet, but all the reviews are happy ones.

Larry, his wife Soleil and I all belong to a drum circle that meets twice a month. It is a lovely meeting of the minds and we always start with a pot luck. The first time I made this salad, it was, as usual, the result of my poking around the house to see what I could put together for one of our pot lucks. As luck would have it, it came out splendidly swell and Larry and Soleil added it to their list of requests for his birthday party. Their request offered me the opportunity to pay attention to what I was doing and write it down for sharing.

Soba Salad
2 bundles of soba noodles
1 cup celery, sliced thin on a diagonal
1 cup carrot, shredded long on a mandoline or spiralized
1/2 of a large red bell pepper, sliced thin
2 green onions, sliced thin
1 cup cucumber, sliced thin on a diagonal then cut into strips
1 tbsp. sesame seeds
1/2 cups toasted cashews
cilantro to garnish
1/2 to 3/4 cup Sesame Dressing (recipe below)

Place a large pot of water on the stove to heat. Meanwhile, slice all the veggies and make the dressing. When the water boils, add the soba, stir and cook for 3 minutes. Do not over cook. Drain and rinse the soba and add to the veggies. Add the dressing and sesame seeds and toss. Just before serving, toss in the cashews and cilantro to taste.

p.s. I forgot to add the sesame seeds before I took the pictures. They were all added before the party!

Sesame Dressing
1/2 cup soy sauce
1/4 cup canola oil
3 tbsp. sugar
3 tbsp. apple cider vinegar
3 tbsp. toasted sesame oil
2 tbsp. seasoned rice wine vinegar
1 tsp. salt
1/2 tsp. freshly ground black pepper

Place all ingredients in a tight-sealing jar and shake. This makes enough for this salad, plus leftovers for another use.


Friday, June 17, 2016

Random Food Fridays - Fettuccine with Chicken and Sun Dried Tomatoes


This is one of those dishes that came together quickly on a weeknight, with handy ingredients, and turned out delicious. You can see that there is more to it than just fettuccine, chicken and sun dried tomatoes, but I didn't want one of those paragraph-long titles like one sees on restaurant menus. Most of these ingredients are pantry staples for me. If you don't keep a jar of sun dried tomatoes around - Do so immediately.

I have to share the story of how I cam by that giant jar of sun dried tomatoes. I've always bought them in the little octagonal jars, julienned and packed in olive oil. They can add a rich and tangy interest to many dishes. One day, my BFF, Miss Paula (sometimes called Powla, by me and no one else) was helping me take care of some chores around the house. One of the chores was cleaning the fridge. Sometimes we all need fresh eyes to help us reevaluate our malingering things. She saw my little jar of sun dried tomatoes and saw the solidified olive oil and thought they had gone bad. (I found out later that she also just doesn't like them in general.) She said things like, "You won't use those!" "How long have you had them?" "What are you going to use them in by the expiration date?" In a moment of weakness, I let her throw them out. Later we talked about it and I explained how much I liked them and that I would, in fact, use them. (Not to serve to her, of course!) She ended up feeling badly and ordering me another jar online. Imagine my surprise when this box was delivered to my doorstep...


with a 35 oz. jar of sun dried tomatoes! 

The good news is, that when you have a 35 oz. jar of sun dried tomatoes, your rationing days are over! Use them hard, use them long and don't hold back! It will be many months before I do not have a substantial amount of sun dried tomatoes available in my pantry!


Please consider that this entire dish was based on what I could forage around my house. You may have different, but just as tasty, findings in your home. Don't be afraid to make it your own!


Fettuccine with Chicken and Sun Dried Tomatoes
1 lb. boneless, skinless, chicken thighs
1 cup of your favorite vinaigrette*
8 oz. sliced mushrooms - I used crimini
1/2 cup julienne sun dried tomatoes packed in olive oil
2 or 3 cloves of garlic, peeled and minced
1/2 cup sliced green onions
3 small zucchini, sliced
1/2 white wine
1 lb. fettucine
Parmesan cheese to serve

Cut up the chicken into bite sized pieces and place in a bowl along with the vinaigrette. Set aside.

Set a large pot of water with a good pinch of salt on the stove to bring to a boil. Add the pasta to the boiling water and allow to cook while you prepare everything else. Cook according the package instructions and drain.

Prepare all the vegetables as described above and set aside.

Heat a large skillet until very hot. Add the mushrooms to the dry pan. Allow them to brown and release their moisture. Once they look a bit dry and leathery add the sun dried tomatoes. Their flavorful oil will help you to pick up any of the good mushroom flavor that has stuck to the pan. Add the garlic, chicken (with vinaigrette) and green onions. Cook until the chicken shows no pink. Add the zucchini and wine and allow to simmer until the chicken is cooked through and the zucchini tender. Taste and add salt and pepper to taste. Stir the cooked and drained pasta into the pan and toss. Heat together for a few minutes to allow the pasta to absorb some of the liquid.

Serve with grated Parmesan cheese.

Serves 4, or us twice.


* My Favorite Vinaigrette 
1 cup extra virgin olive oil
1/2 cup white wine vinegar
1 clove garlic, pressed
1 tsp. freshly ground black pepper
1 tsp. salt
1 tsp. sugar
1 tbsp. course Dijon mustard

Place all ingredients in a jar with a tight fitting lid and shake like crazy.