Friday, October 26, 2012

Random Food Fridays - Butternut Squash and Kale Saute

Yum, oh YUM! Please pass me some!

I was inspired to make this dish by a cooking demo at the Auburn Farmers' Market a couple of weeks ago. Their FM Association uses produce from the vendors to show folks how easy and delicious veggies can be. Because I wanted to share this yummy dish with Mr. Dwayne, I made one adjustment and that was to leave out the wonderful curry spice mix they used. (Sold at the FM for $5 a jar!) Even without the curry flavor, it is savory, sweet and so good. I've made this twice in the weeks since the demo. It is also an awesome frittata filling. Yum!

Butternut and Kale Saute
1 tbsp. olive oil
2 cups of butternut squash that has been peeled and cubed
1 large shallot, sliced thin
1 cup of apple, peeled and cubed
4 cups of kale that has had the ribs removed and been cut into thin ribbons
About 1/2 cup water or broth
Salt and freshly ground black pepper, to taste

Heat the oil in a large saute pan and add the butternut squash, shallot and apple. Over a medium flame, cook until the squash begins to become tender. Add the water a little at a time, if the squash begins to stick to the bottom of the pan. The steam will help the squash to cook and keep the dish from scorching. Once the squash becomes tender, add the kale ribbons and a little more water. Toss to combine and cover. Let the kale steam for a few minutes until it is tender. Adjust seasoning and serve.

Butternut and Kale Frittata
1/2 cup Butternut and Kale saute
2 eggs
1 tbsp. Greek yogurt
Salt and freshly ground black pepper to taste
2 tbsp. grated Parmesan cheese

Add the veggies to an 8 inch omelet pan with an oven proof handle. If it is not non-stick, add a little butter first. While the veggies are heating, beat the eggs, yogurt, salt and pepper together in a bowl. Add the egg mixture to the pan. Place a rack on the top shelf of your oven and heat up the broiler. Gently lift the edges of the frittata and let the liquid egg run under the cooked part. When the eggs have barely set, but are still runny on top, sprinkle with the cheese and place under the broiler. Broil just until the cheese melts. Remove from the oven and gently tilt and scoot the frittata onto your plate and eat!

Friday, October 19, 2012

Rose Hip Syrup


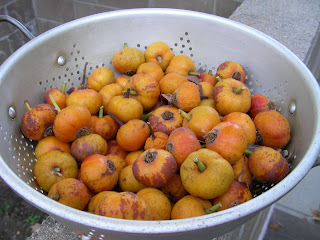
I've been taking care of my great grandmother's and my grandmother's roses for years. I retired from caring for my grandma's roses when she sold her house. I still care for the roses that are left from my great grandmother as we've lived in her house for almost 30 years. I was taught to dead head roses right away. By doing this, you keep the roses' energy directed at blooming at not at completing the reproductive cycle. If I ever saw a rose hip developing, I thought, "Dang! I missed one." Not, "Yay! Rose hip syrup!" When I discovered a cache of rose hips in a parking lot I knew it was my big chance.


I keep my eyes open for foraging opportunities as I wander through my life. Turns out that there is a rose hedge, next to my Trader Joe's, that has been pretty much abandoned. For a forager, this is a good thing. I know it hasn't been sprayed or fertilized for some time. There was once an Italian food market on the other side of the rose hedge from TJ's, but now there is a pet supply store and they don't have any interest in the roses. The rose hips on these bushes are large and orangey yellow. You may see wild roses with little red hips. I've read that these are very good for syrup too.


My friend, Miss Pauline, who is a gardening genius, told me that rose hips are sweeter after a frost. I'd be awaiting a frost for long months in this climate. There are some winters where we don't have a frost at our elevation at all. I have now made two batches of rose hip syrup, from these same bushes. The first batch was made when the hips were larger and juicier. For the second batch, the hips were dryer and some had been a bit sunburned. My perception is that the first batch has less bitterness than the second. It may be that in cold climates, the rose hips would freeze while still moist. With our unseasonable heat, they've just been drying up. If these hips are available next year, I'll try to work with them in September, when they are still plump.

As I researched recipes for rose hip syrup, I found many war time references. Check out this article that explains how rose hip syrup was used to prevent scurvy in the UK during WW II. Rose hips are very high in vitamin C. Because of the vitamin C content, I thought they would be very sour. I was thinking of a flavor something like hibiscus, but this rose hip syrup is nothing like that. I smells and tastes like apples, almonds and rose petals all in one. The flavor has a subtle bitterness that I balanced out with lemon juice. The lemon juice also brought up the acidity to a safe level for water bath canning. Some recipes for this type of syrup are thick with sugar. I didn't intend to end up with a syrup suitable for pancakes or a dessert topping. I wanted a syrup more analogous to fruit juice for flavoring soda water. I really like this flavor and it's like no soda I've ever had before. It is a great way to get a good dose of vitamin C in a tasty, sparkling form.

Rose Hip Syrup
2 pounds ripe rose hips
3 quarts water
1 cup sugar
1/4 cup lemon juice

Wash the rose hips and remove any extra stems or flower parts. Place in a large pot and add the water. Bring to a boil, reduce heat and simmer until tender - about 90 minutes. Mash the hips with a potato masher and simmer about 10 minutes more.

Place a colander over a smaller sauce pot and line the colander with at least 6 layers of cheese cloth. Pour the rose hip mash into the colander and let drain. If you want a clear liquid, as for jelly, let it drain slowly with no pressure. I squeezed every last bit of liquid out of mine! You can prepare everything up to this step, add the lemon juice and refrigerate until ready to bottle.

When ready to bottle, prepare 6 half-pint jars and lids and the boiling water bath. Bring the liquid to a boil and stir in the sugar. Simmer while waiting for the BWB come to a boil. It will reduce slightly. Carefully ladle the syrup into hot, sterilized jars. Wipe rims and top with lids and rings and close to a finger tightness. Process in the boiling water bath for 10 minutes. Carefully remove and allow to cool.

Makes 5 to 6 half pints.

For a refreshing soda, add 3 tbsp. syrup to a pint of sparkling water and ice.

Friday, October 12, 2012

Random Food Fridays - Apple Sauce


It's apple time! We've been waiting for the cool Fall breezes for a while now. Our temperatures were close to a hundred right up through the end of September. We've had overcast for a few days now and I am hoping for the rain. Nothing makes our air (which can be pretty exhaust filled) smell so clean as the first good rain of Fall.

You may recall that I made homemade pectin out of green apples from my father-in-law's MacIntosh tree. I can usually make the green apple pectin sometime in June. The ripe apple harvest happens in September. I had two big grocery bags of apples on my kitchen floor for a couple of weeks. I'm lucky. These apples have such great character (flavor and aroma) that they forgave me for allowing them to get a little overripe.

MacIntosh apples are one of the great cooking apples. They are tart and sweet and cook down nicely. I decided to make apple sauce out of these apples. I read the Ball Blue Book for basic instructions, such as acidity and timing for the boiling water bath, but I did not follow their recipe. Most apples are acidic enough that you need not add anything to them to bring them to a safe PH for the boiling water bath. Even so, I love some lemon to brighten things up. Unless you burn it or allow it to spoil, it's really hard to make apple sauce taste bad. I spent about an hour coring the apples and removing any bad spots. (There were a few worms, but hey, they are healthy organic worms!) I had enough to fill my three biggest pots! To each pot, I added 1/4 cup lemon juice, 1/2 cup sugar, two cups of water, a good sprinkling of cinnamon and a dash of salt. I didn't peel the apples because I just run the cooked apples through a food mill. I think I capture some of the color and nutrients of the peel that way. (And really, who wants to peel when you don't have to?)

 Here they are, cooking away. I smashed them with a potato masher to help them break down. 


After about 30 minutes of simmering, they were soft enough to put through the food mill. I ended up with my big stock pot FULL of apple sauce! At this point, I put the big pot in the fridge for the night and went to bed.


The next evening, after work, I sterilized my jars and lids, prepared the hot water bath and heated up the apple sauce. This is when I tasted and adjusted for flavor. It tasted just right to me. You can always add more lemon, sugar or spice. When everything was nice and hot, I ladled into wide mouth pint jars, used a bamboo skewer to release the bubbles and processed for 20 minutes. My two brown grocery bags full of apples turned into 12 pints of apple sauce. I must say, it's really good! To make yummy apple sauce, you don't need to tackle 12 pints' worth. Even if you buy a couple of pounds of good apples at the farmers' market, you can make apple sauce by this same method and just store it in the fridge for a week or so. I bet you eat it all before you find out how long it takes to go bad!

Thursday, October 4, 2012

Random Food Fridays - White Bean Guacamole


I can't believe I haven't given you a RFF post since September 7th! Life has been pretty hectic. Family stuff, work stuff, harvest stuff, canning stuff, Fall garden installation stuff. Whew! Zip! Bang! Pow! Mother Nature requires attention to timing. Late Summer/early Fall are high intensity times in the garden. This is true, even for a tiny garden like mine. So far, tomatoes, green beans and chard have come out. Kale, peas, spinach, carrots, daikon and radishes have gone in. I still have more to plant, including some lovely fava beans to fix nitrogen in the soil. I don't know if I like fava beans, but they are very pretty bushes and do the soil a lot of good.

So, here I am on a Thursday night, creating my post for Friday. Tomorrow we have the pleasure of attending the opening of a sci-fi and fantasy inspired art show at Art Ark Gallery in San Jose. Our girl is showing her work! We did have plans to bring her back home with us for a visit with her grandmas, but she's had a bad cold. We just can't take germs around the oldsters. So, instead of a round of grandma visits, we will be viewing her show and coming back home to our empty nest.

When life gets crazy, I often end up eating on the fly. Even if I don't eat fast food, I often eat too fast! I really like to eat my own food. That's why I do all this stuff. I mean, it's GOOD! If  I plan ahead, I can avoid spending my lunch time obtaining food and just start eating. If I know things are ratcheting up, I have to plan work-day lunches on Sunday. That's the only way to do it. Beans are a favorite. They end up in salads, soups, spreads, and dips. To make cooking from dry beans easier, I measure, sort, wash and then place the beans in a jar in the fridge until I'm ready to cook them. They can wait for several days. You have to pick a jar that is a lot bigger than your beans because they grow so much. I usually put 1 cup of dried beans into a quart jar of filtered water. The next step is cooking. If you are home for a few hours, cooking on the stove stop only takes an hour or two, depending on the type of bean. One of my favorite ways to cook beans is in the crock pot. I drain and rinse the soaked beans and add them to the crock pot with fresh water. I've cooked them overnight or during the work day. Voila! Cooked beans with no effort.

This dip is super yummy. It's kind of a hybrid of bean dip, hummus and guacamole - all flavors I love! I've enjoyed this with soft corn tortillas, corn chips and fresh veggies. Gotta change it up somehow, right?

White Bean Guacamole
1 cup dry, small white beans
1/4 cup red bell pepper, diced small
2 tbsp. shallot, diced small
1 large clove garlic, crushed
big hand full of loosely chopped cilantro
2 tbsp. lemon juice
1 tbsp. extra virgin olive oil
1/2 salt
1 tsp. Tapatio sauce
2 ripe avocados

Sort and rinse the beans. Place them in a quart jar and fill the jar with cold water. Place in the fridge until ready to cook. Soak at least 8 hours.

When ready to cook. Drain and rinse the beans. Place them in a crock pot and cover with cold water. Cook on low for 6-8 hours. (You will get to know your crock pot just like you get to know your oven.) When the beans are very soft, drain. Allow the beans to cool off a bit. They can be warm when you add the other ingredients, but don't add them when they are so hot that you risk wilting the cilantro. Mash the beans and stir in the remaining ingredients except for the avocados. If you are serving this at a party, you can mash the avocados in all at once. Because I took this for several lunches, I mashed in half an avocado for each lunch.

Makes about 3 cups