Pretty, right?
I've made a lot of marmalade. I love it. I searched my blog and found I have made at least 7 varieties. I make new batches of most of them each winter, when the citrus fruits come in and the kitchen is cool.
Marisa at Food in Jars has started a Mastery Challenge. I'm so excited, because I will get to refine my skills and learn new ones. The challenge for January is marmalade. I missed the deadline to make this an official entry, but I want to share it anyway. Next month is salt preserving and I'm already scheming. I'm grateful for the challenge to try new techniques. I may even screw my courage up enough to try pressure canning!
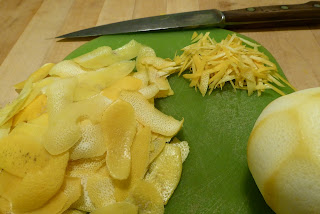
I scrubbed the fruit, peeled the zest and sliced it thin.
This marmalade submission was delayed for the best possible reason - vacation! I spent two weeks of January on the Big Island of Hawaii. Ahhhh..... When I returned, I visited Ms. Paula and saw that the grapefruit tree behind her apartment building had dropped a bunch of perfectly nice fruit. We scooped them up and I took them home. Fast forward one week, when I finally had time to do something about this literal windfall. I lost about a quarter of what I had gathered to the bruises that has begun to mold. The bruises only became apparent over time. If I had prepped the fruit sooner, I would not have lost so much. (I'm taking this lesson to heart, as I have many dozens of Meyer Lemons in my kitchen even as we speak!)
Combine the zest and 4 cups cold water.
Bring to a boil and simmer for 20 to 30 minutes.
While the zest simmers, cut away the pith and supreme the fruit.
Grapefruits are more bitter than most citrus. The fruit itself is bitter, not just the rind. By simmering the zest, much of the bitterness will be removed. For this recipe, I discarded the simmering water. For less bitter fruits, I often add some of this simmering liquid back into the recipe.
I spent some time thinking about what flavors might enhance grapefruit. I thought about the mint I like in citrus salads. I thought about the way people sometimes broil grapefruits halves with sugar to make a kind of caramel topping. Then I thought about honey. Grapefruit, honey and mint! And, it worked!
The prep happened one evening, then, off we went to bed.
After cooking, skim the foam and add the mint sprigs. They will add a bright flavor!
Remove the mint sprigs. Stir gently, fill the jars and process in the boiling water bath.
Yum!
Grapefruit with Honey and Mint
About 10 Grapefruits - enough to result in 1 1/2 cups sliced zest and 4 cups segments and juice
4 cups Water
1 cup Honey
4 cups Sugar
1 Bunch of Mint
Scrub and dry the grapefruits. Peel just the zest. If your peeler is wide (like mine) stack and slice the zest. Place in a pot with 4 cups cold water and bring to a boil. Reduce heat and allow to simmer for 20 to 30 minutes.
Meanwhile, use a sharp knife to cut away the pith. Cut the segments away from the membrane. Do this with your cutting board inside a pan to catch the juices. Add the segments and juice to a large measuring cup.
Drain the zest and rinse with cold water. Add to the segments and juice. You should have at least 4 cups total. Add the honey and sugar and stir. Cover and place in the refrigerator until you are ready to can.
On canning day, prepare the boiling water bath and 6 half pint jars, their lids and rings.
Place the prepared marmalade in a large pot. Bring to a boil and continue to boil, stirring occasionally, until it reaches 220 degrees or until it passes the cold plate test. This will take 30 to 40 minutes.
While the marmalade is cooking, prepare the mint by washing it and tying it into a bundle with cooking string.
Remove the pot from the heat and skim off any foam. Use tongs to place the mint bundle into the mixture. Submerge it and stir gently. Allow to steep while you sterilize the jars in the the boiling water bath.
Remove the mint bundle and any leaves that may fall off. Stir gently to distribute the solids throughout the thick syrup. Fill the hot prepared jars, leaving 1/4 inch head space. Wipe the rims and cover with lids and rings. Process in the boiling water bath for 10 minutes. Carefully remove to a towel lined tray. Makes 5 half pint jars and a little left to use right away.


